DIY
I will post DIY projects as they are completed, but the list is as follows:
STDs (see All Things paper for completed postcard)
Invites
Menu Cards
Centerpieces
Thank You Cards
"Program" Water Bottles
Table Numbers
Parasols
STDs (see All Things paper for completed postcard)
Invites
Menu Cards
Centerpieces
Thank You Cards
"Program" Water Bottles
Table Numbers
Parasols
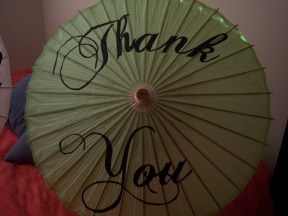
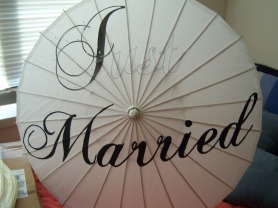
DIY Parasols
So, these were my first attempt at DIY anything and i think they turned out GREAT! You can buy these on Etsy for around $40, but mine ended up costing about $12 total! It is time consuming (about 4 hours per parasol), but if you pop in a movie and take some short breaks, it isn't so bad! I will be selling these 2 babies after the wedding, so if you are interested, PM on the knot (supergirl377).
Supplies:
Parasol (asianideas.com or pearlriver.com are the cheapest)
fine tip sharpie marker
computer and printer
pins (like for sewing)
pencil
acrylic paint (this paint will stay flexible when it dries and will not "crack")
Directions:
1. Find a font that you like. I used "Chopin Script" from dafont.com (this is the same font used when you see these parasols in Wedding Magazines or if you do a quick search for them online).
2. Open a 20 X 20 banner in publisher and type in your text
3. Print banner (you will want to use the "tile" setting so it prints straight to the edge as this will take multiple pages). Now, one thing I noticed was that when I printed my banner, a few of the swirls on the letters were cut off. To fix this, open a new document, open a text box, and print just the first letter again in the same size font. You might have to move the text box around the page to get the right part printing)...use print preview to see how it is going to look!
4. cut out letters. Lots of people have said that you can just tape the letters to the backside without cutting, but I like having more control by actually having a stencil to work with. Use small scissors and cut carefully! This was definitely the hardest part!!
5. Position letters onto parasol and pin them in place. Yes, this will create small holes in the parasol, but you will not notice them in the pictures!
6. Once letters are in place, outline them in pencil. Be careful not to poke through the paper!
7. Remove the stencil and trace pencil outline with a fine tip sharpie marker
8. Paint in your letters! I used 2 size brushes for this. I have heard of people simply coloring in the letters with a sharpie, but I think the paint has a better look to it. I used three coats.
9. Let dry overnight before closing up your parasol!
Below is an example of a finished parasol and also one in process. The one on the right have been painted on the bottom, the "J" still needs to be traced and un-pined, and the "ust" has been traced in sharpie, but not painted.
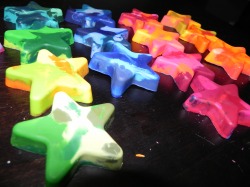
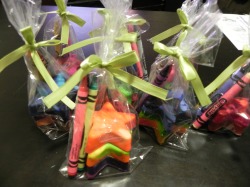
Star Crayons
Following an amazing idea from Mrs. B Rad, I decided to try and make some star shaped crayons and I think they turned out great!! I think I used a bigger mold than a lot of other people use, so my process to make 8 crayon bags took a little longer (as I had to make smaller batches # wise), but it was totally worth it!
How To:
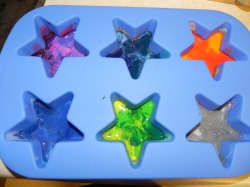
break into pieces, cook at 225 degrees for 25 minutes. Cool on counter for 10 minutes, cool in freezer for 10 minutes. Pop 'em out and wrap 'em up!!
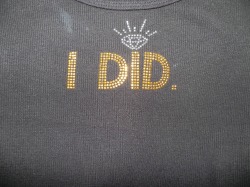
I DO and I DID Tanks
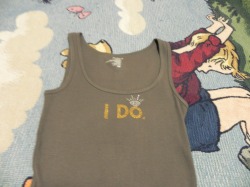
I just bought the "I DO" decal from Michaels, but thought it would be fun to have an "I DID" tank too for the honeymoon. So, I just bought 2 more "I DO" decals and cut out the letters individually. I guess it came out a little crooked, but that is fine by me...you can't really tell when it is on!
BM Gifts
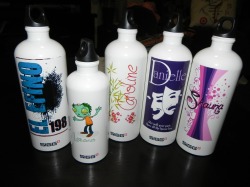
I had a graphic designer on Etsy create a graphic for each BM (and the RB) and then I had them printed on SIGG bottles. I think everyone will love these!!
